70 Lumen Trionic LED Rear Lights (pair)

This manual both shows how you attach the rear light and the light on a Walker (left column below) and also how you attach them on a Trionic Veloped (right column below).

In the left-hand photo, A shows the 10-degree angled strap for attaching the lights on a Trionic Walker. B shows the 0-degree angled strap for attaching the lights on a Trionic Veloped.

B shows the 0-degree angled strap for attaching the lights on a Veloped.

70 Lumen Trionic LED Rear Lights

Attaching the LED Lights

Instructions for a Walker

Of the two rubber straps included, choose the one with a 10-degree angled light attachment section.
A1. Of the two rubber straps included, choose the one with a 10-degree angled light attachment section.
Push the light into the slot of the strap until it snaps in place.
A2. Push the light into the slot of the strap until it snaps in place.
Attach the light to the Walker, either on the semi-vertical frame tube just below the height adjustment quick-release lever, or on the black semi-vertical grip tube. Pull the strap tight and fix it with the plastic hook.
A3. Attach the light to the Walker, either on the semi-vertical frame tube just below the height adjustment quick-release lever, or on the black semi-vertical grip tube. Pull the strap tight and fix it with the plastic hook.
Pull the strap tight and fix it with the plastic hook.
A4. Pull the strap tight and fix it with the plastic hook.

Instructions for a Trionic Veloped

Of the two rubber straps included, choose the one with a 0-degree angled light attachment section.
B1. Of the two rubber straps included, choose the one with a 0-degree angled light attachment section.
Push the light into the slaot of the strap until it snaps in place.
B2. Push the light into the slaot of the strap until it snaps in place.
Attach the lights to the Trionic Veloped, preferably on the two rear vertical frame tubes, below the height-adjustment quick-release levers. Pull the strap tight and fix it with the plastic hook.
B3. Attach the lights to the Trionic Veloped, preferably on the two rear vertical frame tubes, below the height-adjustment quick-release levers. Pull the strap tight and fix it with the plastic hook.
Pull the strap tight and fix it with the plastic hook.
B4. Pull the strap tight and fix it with the plastic hook.

Instructions for Use

The package contains

Caution

It is normal for the battery to reach a high temperature (up to 104°F / 40°C) during charging due to chemical reactions within the battery. The battery may also become warm if it is not fully drained before charging.

Several factors can affect the battery's lifespan, including the type of cell, usage strain, maintenance routine, temperature, and the number of charge cycles. Generally, a higher battery capacity results in a longer operation time.

The battery capacity may decrease to approximately 80% of its original capacity after 300–500 charge/discharge cycles. With proper care, the battery can have a lifespan of up to 3 years.

Water resistant is for rain water only. Do not submerge the bat- tery or the whole light into water when cleaning. Clean the light with a soft damp cloth when needed."

Battery Performance

Battery performance is significantly affected by temperature variations:

Low Temperature: At 0°C, capacity decreases by 5–10%, reducing operation time by 50%. At -20°C, capacity drops by 30%, potentially shortening operation time by 70%. Performance returns to normal when the temperature rises to 20°C.

Self-Discharge Rate: At room temperature, the battery loses about 1% of its capacity per day. When stored at 40°C, the self-discharge rate increases, leading to a loss of approximately 5% of capacity per day.

To maintain optimal battery performance, avoid exposing it to extreme temperatures and store it in a cool, dry place.

If you do not use the battery for a long time be sure to recharge the battery every 3 months.

How to charge the battery

  1. Find the charging place at the bottom of the light.
  2. Lift the rubber cover to access the charging port.
  3. Plug the USB-cable into your USB-charger.
  4. Plug the charging cable into the light's charging port.
  5. The indicator shows red during charging.

The charging indicator turns green when fully charged.

Attention: Use the original supplied USB-cable to charge the battery. Unplug the charging cable once the battery is fully charged.
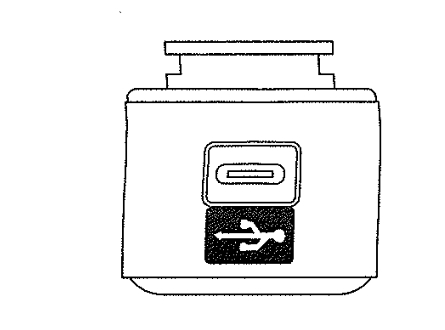
How to charge the battery

How to operate the light

How to operate the light text

Safe Mode

When the battery is low, the light will automatically switch to a 5-lumen steady mode, providing an additional 30 minutes of operation.

Product Reviews    

  • Brilliant product…

    It has been such a relief to get out and about in the countryside and be active again. It easily copes with different terrains, and the support it provides enables me to walk upright easily, as opposed to previously when I could only go a very short…

  • I am extremely happy with my 'Terminator', thank you.…

    As you may remember I needed to adapt it to have forearm rests instead of handles and found the charity organisation 'Remap' here in the UK who were able to take the forearm rests from an old rollator (an indoor Topro) and put them on my lovely new T…

  • It has been a couple of months now since I first got my Veloped Trek.…

    After a few weeks of use, my foot no longer hits the front wheel and the problem I had with navigating the unit in tight corners in the climbing mode has ceased. I suppose it was simply a matter of accustoming myself to the unit that resolved these m…

  • Completely convinced!…

    The Veloped Tour is really a great help for taking a walk or a hike if you have shortness of breath.

    In fact, you can sit on the 30 cm deep seat at any time, the brakes keep the Veloped perfectly stationary. The armrest and back support are very c…

    Veloped Tour 14er M black/reflex/red
    by Kundin aus dem Schwarzwald
  • This walker has given me my life back……

    I have really bad balance and my walker with 12” wheels gives me a great feeling of stability. I also obedience train a golden retriever and this walker has made it easier to walk on grass with her. The other thing it is so much easier due to its lig…

  • The best outdoor rollator on the market…

    The admittedly high expectations of the Veloped (see previous reviews) were easily fulfilled. No other rollator I know is as stable, safe and reliable as the Veloped and so qualified for use in the countryside, woods and forests.
    However, the high s…

  • Mrs Ann Conry…

    So far so good. It feels sturdy and goes brilliantly. No complaints.…

  • Walker…

    Beautiful walker. It runs very smoothly, and it is fantastic for walking. I can recommend this device any time. I would say that every part is worth its price. The only thing that bothers me is that the cork handles are always sticky to the touch. Wh…

  • Wow, exactly what was expected.…

    Excellent service, communication skills of Stefan are brilliant.

    Couldn't ask for or expect better delivery, quality, packaging etc, etc.

    A five-star piece of equipment and five stars for communication and service.

    Thank you for giving our s…

Subscribe to our newsletter!